How to Paint a Pear with Watercolors/art.jp.net
ここに掲載されている透明水彩画は、Anna Masonのオンラインスクールが提供する
写真を使用して制作された細密画です。Miniature painting.
The transparent watercolor paintings shown here are
miniature paintings created using photographs provided by Anna Mason’s online school.
透明水彩絵具でリアルな洋ナシを描いてみました。
I drew a realistic pear using transparent watercolors.
初級レベル 洋ナシ
野菜の水彩画
How to draw a pear watercolor painting
洋ナシの水彩画の書き方
初めての細密画に挑戦です。
洋なしはやや縦に長く、いびつでびん型をしています。
果皮は赤や黄色、緑など様々です。
日本において栽培されている品種の多くは緑色で、追熟させると黄色になります。
今回、見本にしたのは、まだ緑色の状態のものです。
果皮には「さび」と呼ばれる、傷のような褐色の斑が多数ありますが、これをどのように描くかが課題です。梨は、手触りの感触と形の両方をペイントすることが課題です。
梨の表情がどこまで表現できるか挑戦です・・・
・水彩画の筆は 000・0・1・3号
・水彩紙は 半紙を
・水彩画用鉛筆はB
使用した透明水彩絵の具
・バーントシエナ
・ペインズグレイ
・パーマネントローズ
・ウィンザーレモン
・黄土色
This is my first attempt at miniature painting.
Pears are slightly long and distorted into a bottle shape.
The fruit skin varies in color, including red, yellow, and green.
Most of the varieties grown in Japan are green and turn yellow when ripened.
The sample I used this time is one that is still green.
There are many brown scar-like spots called “rust” on the fruit skin, but the challenge is how to depict these. The challenge with pears is to paint both their texture and shape.
It’s a challenge to see how far you can express pear’s expression…
・His watercolor brushes are No. 000, 0, 1, and 3.
・For watercolor paper, use hanshi paper.
・Watercolor pencil is B
Transparent watercolor paint used
・Burnt Sienna
・Pain’s Gray
・Permanent rose
・Windsor Lemon
・Ocher color
I tried a pear draft
洋ナシの下書きをしてみました
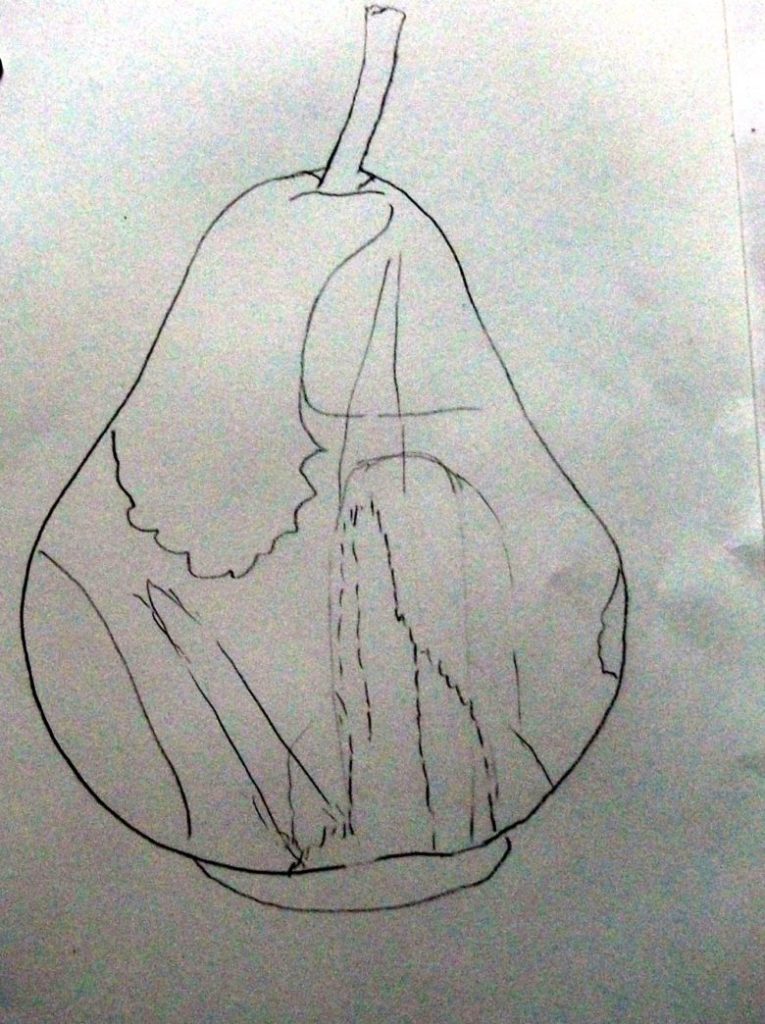
これは、実際のものより少し大きめに水彩で描くのが初心者の練習に適しています。
初めて水彩で描くので戸惑いました。暗い部分と明るい部分を描きました。
This is a good practice for beginners, as it is best to draw watercolors a little larger than the real thing.
It was my first time painting with watercolor, so I was confused. I drew the dark and light parts.
base the pears
洋ナシの下塗りをする
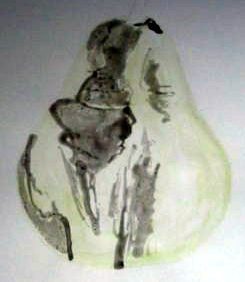
透明水彩画の下塗りは、薄く溶かしたペインスグレイで光の当たっている部分からぬり、次に日陰の部分を塗りました。動画ではどうもこんな感じで描いています。本当にこれでいいのかやってみなければ分かりません・・・
透明水彩絵具はペインズグレイをメインに使用しました。
For the undercoat of the transparent watercolor painting, I applied a thin layer of pains gray, starting with the light areas, then painting the shaded areas. In the video, it looks like this. You won’t know if this is really good until you try it…I mainly used Payne’s Gray as the transparent watercolor paint.
Paint the pears a bright color
洋ナシに明るめの色をぬる
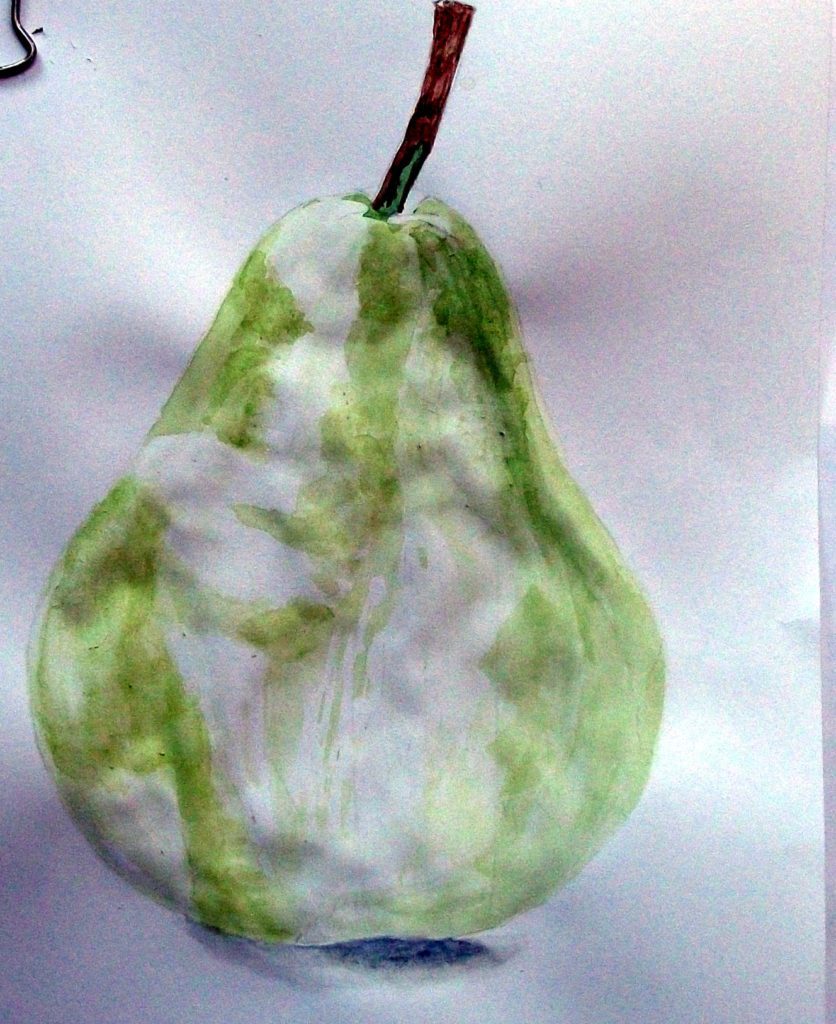
茎をバーントシェンナとペインズグレイを配合して、たっぷりの水で薄めて塗ります。
水彩画の3D表現するために、ウインザークリンで光の当たっている部分を薄く塗り、日陰の部分を濃く塗りました。
下の樋掛の部分はとくに濃く塗りグラデーションの練習です。
透明水彩絵具はウィンザーグリーンをメインに使用しました。
Apply a mixture of Burnt Sienna and Payne’s Gray to the stems, diluting it with plenty of water.
To create a 3D watercolor effect, I used Windsor Clean to apply a thin coat to the areas exposed to light and darker areas to the shade.
I painted the lower gutter part especially darkly to practice the gradation.
I mainly used Windsor Green as the transparent watercolor paint.
Finish by drawing the entire pear
洋ナシ全体を描いて仕上げます
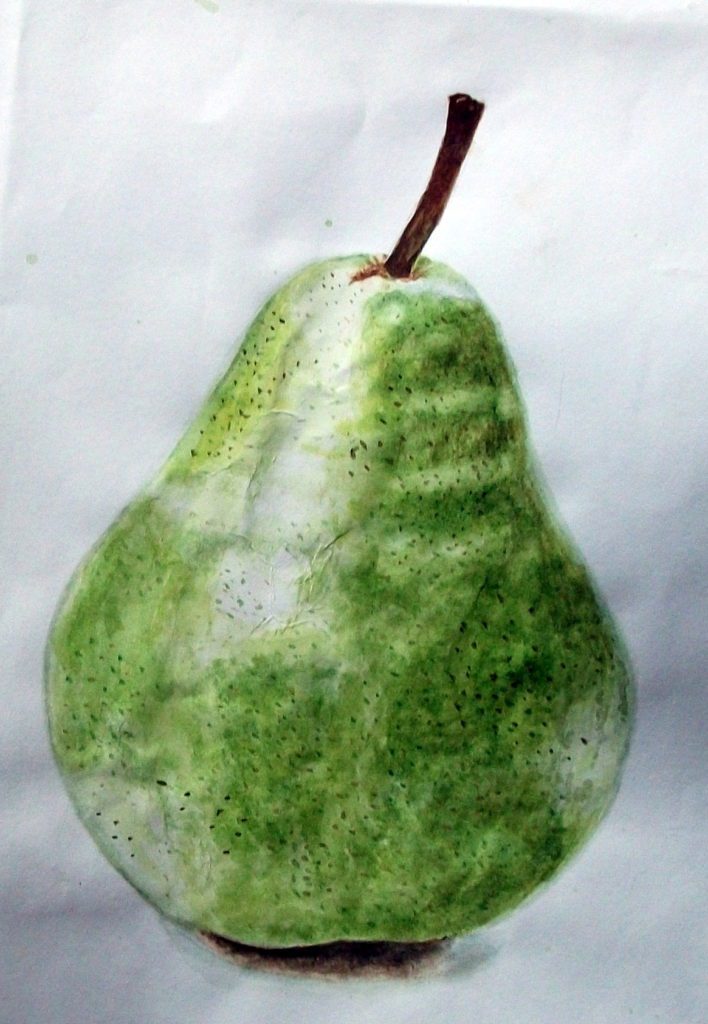
水彩画の最終仕上げは、透明水彩絵具はウィンザーグリーンをメインに使用しました。
光の当たっている部分と影の部分の境を微妙に調整しました。茎の部分は、まだ初めてなのでうまく表現できませんでした。
表面の粒粒の質感を出すのには、000号の筆で慎重に一つ一つ丁寧に塗っていきます。
べた塗りになってしまい質感を表現するのがむつかしいです。
2日ほどかかりましたが初心者の練習には一番描きやすいものです。
For the final finish of the watercolor painting, I mainly used Windsor Green as the transparent watercolor paint.
I made subtle adjustments to the boundaries between the illuminated areas and the shadowed areas. I couldn’t express the stem part well because it was my first time.
To bring out the grainy texture on the surface, I carefully applied each layer one by one with a No. 000 brush.
It’s difficult to express the texture because it becomes a solid color.
It took about 2 days to draw, but it is the easiest to draw for beginners to practice.